Most Sweetpea tutorials use a 'cell-for-cell' method, that is a bit difficult to start for many learners. Mine uses another approach called by me 'Shaggy Loops' method, that works from a stable basis chain, and modifies it to become Sweetpea, in the end. It works quasi analogous to the Full-Persian starting method by modifying the weaving of Boxchain. As it's so easy (imho), I put it into a single photo.
First, chose rings with an Aspect Ratio of at least 3.8; AR 4.0 is near to optimal, and rings of more than maybe AR 4.2 should be avoided - I did not yet probe the upper stable AR limit, that were also 'tumbler safe'. A good option are the well available rings of 16swg (1.6mm) 1/4" type, 18SWG (1.2mm) 3/16" work also well - and who wants it smaller, should chose 19swg (1.0mm) coiled on 5/32" (4mm), or 20awg (0.8mm) 1/8". The given ring data are valid for soft (e.g. Copper) to medium-hard (e.g. Bright Aluminium) materials - for harder materials with higher springback I suggest to adjust mandrel sizes down, to balance springback. This tutorial's sample chains were made from slightly smaller 16swg (1.6mm) 15/64" (~6mm) Bright Aluminium rings at final AR of around 4.0, that give a nice, tight, and near optimal pattern.
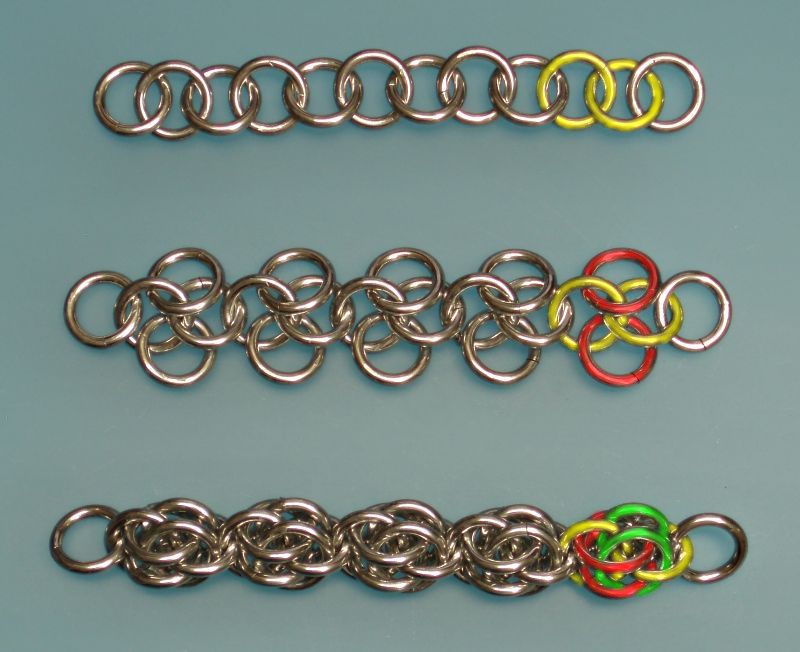
Step 1: Weave a simple 2in1 (1-1-1) chain. As the use of preclosed rings increases maille quality, work with these, by connecting a preclosed ring with a new open one to an existing chain segment. I marked two of these basis chain's rings yellow, that become a Sweetpea cell's core.
Step 2: Add two additional rings in 'Shaggy Loops' style to every second 2in1 chain ring - one left, one right. These are marked red, for one weave cell.
Hint: By extending the preclosed-ring method, one can also waive the step 1 chain completely, but directly add three preclosed rings to an existing chain, and continue with the central one of the three. By using that method, effectively half of a Sweetpea chain's rings can be preclosed before actually weaving - so this becomes not only a quality-enhancing but also quasi a 'speedweave' mailleing method.
Step 3: I don't explain it, but refer to the image, and ask you to have a close look, how the previous step's 'red' rings have to be placed by shifting them a bit 'back', sandwiching the previous cell's connector ring, and then setting the cell completing rings, that I marked green for that one color coded weave cell. It should be self-explaining, seen in the succession of sample chains.
Hint: Especially if woven from lower-AR rings it can be a bit difficult to close the last ring of a cell due to tight work space; here pliers with flat, thin jaws (e.g. Duckbill type, or so-called relais adjustment pliers) are a great help to get this done.
Have fun with Sweetpea :)
-ZiLi-