Again I was asked to show more - so I tackeld the next Goldberg polyhedra. At the moment the Goldberg G (4,1) that I call 'Nutsohedron', and the G (5,1) called 'Absurdihedron' were created - and now also the 92-face 'Yetsanihedron'.
The former two share the same basic structure with the Insanihedron described in the previous article, and are just built from triangles with higher edge length as the Goldberg (3,1) polyhedron. So I describe here only the creation of these larger triangle building blocks. The yetsanihedron and maybe somewhen more is described further down in this article.
Ring data chosen here are (nominal mandrel sizes; final data differ) fairly similar to the ones used for Insanihedra, as also the structure is similar - only the 'corner buds' differ a bit, and of course the ring amounts.
(A) 280 x 12swg/2.4mm x 3/4" for the larger face rings,
(B) 120 x 12swg/2.4mm x 18.0mm for the slightly smaller face rings,
(C) 24 x 12swg/2.4mm x 7/16" for the icosahedron corners,
(D) 1890 x 16swg/1.6mm x 15/64" for the connector rings.
NOTICE: The S kits use PAIRED connectors only unlike the tripled ones shown in this tutorial!
Update: To get a real sphere in the XL and also the S design, I needed to modify the base triangle design a bit - forty of the (A) rings will here be replaced by slightly larger ones - I document these as 'O' ones. Ring data will be given to ball kit buyers only - sorry.
But now let's begin.

First preclose quite a bunch of (D) connectors - in tripled-connector Nutsohedra a total of 1080 connector rings can be woven as preclosed ones - twenty times 54 connectors per triangle. So preparation of these may be boring, but will make the final ball construction quicker, if this amount is preclosed in the first place.
Then add eighteen (18) connectors on a large (A) ring, and after closing, add a parallel A ring, to double up.
Note that in the S and XL size, this core consists of an 'O' instead 'A' ring pair. Maybe I'll modify the L design in similar way, soon, to optimise the shape - and to avoid getting sinking-in triangle faces.
Now add nine (9) connectors to an A ring, and go through three of the central rings' connectors - and finally double up.
Next step, of adding six (6) connectors to a fresh A ring, going through 3 core, and three of the previous large ring's six addon connectors, and doubling up, repeats four times.
And last, but not least the hexagonal center flower is finished with three addon connectors, going through 3 of the first petal connectors, the last 3 core ones, and 3 of the previous set ring - and again doubling-up is asked for.
Hint: In the ball designs with 'O' core, it may be of advantage to weave the surrounding 'A' rings as single ring first, before finally doubling them up, to avoid having that 'O' ring accidentally off-center - that would lead to an irregular bump in the finished ball's shape.
Best weave directly twenty of these flowers, before the next step is done, to convert the hexagonal core flowers into triangles.
When done, get the bag with (B) rings, and add three ring pairs at three corners, through the yet unused connectors of the core flower, so each is held with two times three connectors to the core.
The remainder of weaving is identical to the Insanihedra - just the triangle edge seams are longer - so I refer to their tutorial (linked already above, but here again :).
Like the Nutsohedron shown above, this is a spheroid based on twenty triangles, that are woven to a ball in the same manner as the Insanihedron. Here just the base triangles grow a step further, and so only their build is shown here, and then referred to the Insanihedron tutorial for mounting them.
The triangles for the Absurdihedron need to be built from three sizes of face rings (plus of course connectors as fourth size), to give the triangles already their surface bend, as was done already for the XL Nutsohedron design. And so, we start with the 'O' rings, and let the A and B bags yet closed. And we work, like in previous designs, with as many as possible preclosed 'D' connector rings. Here we need 90 preclosed connectors per triangle, totaling 1800 of the connectors woven preclosed (phew!). This is the really laborious part, but I recommend to do a 'slave-work' session first, to have them on hand when building the triangle building blocks.
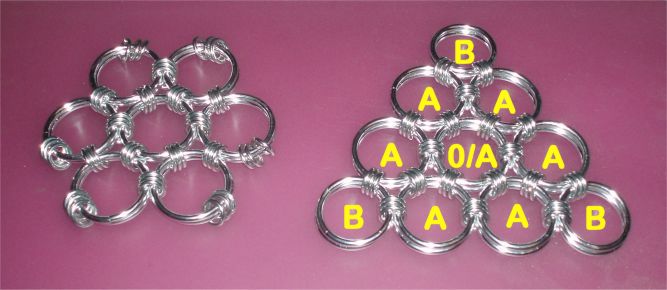
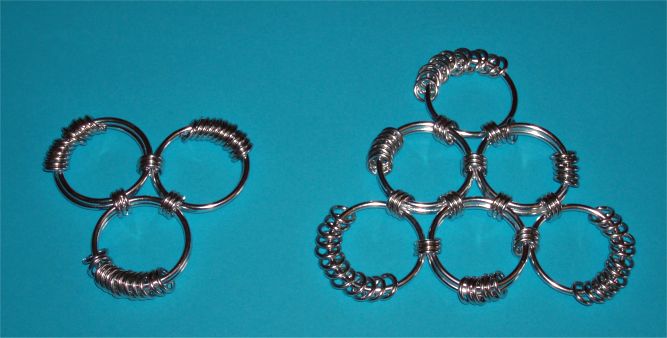
The first image shows the build of the very core of each triangle in following succession:
Once twenty of the six-face triangles are built, the 'O' ring job is already done.
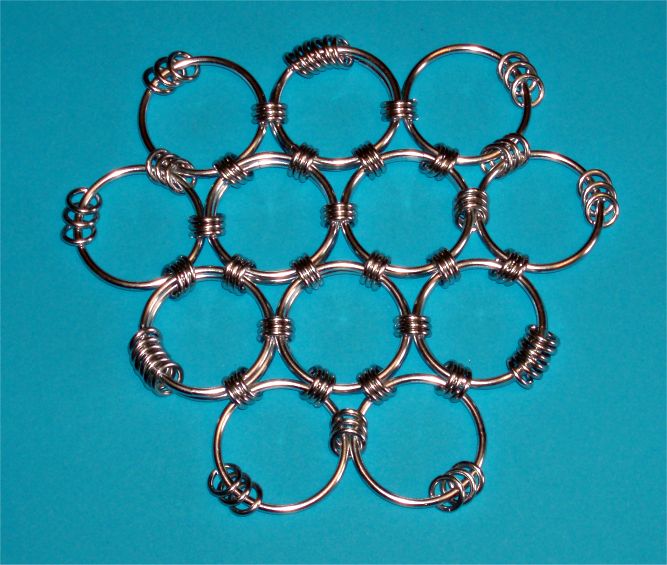
Now start with the 'A' rings.
The final step is easy - just add a 'B' ring pair at each of the corners, and you're done with triangle building. You may note, that the triangles have already the 'wish' to bend a bit, what results in the end with a nicely bent surface, that goes conform with the spheroid shape of this triangle in the finished ball. The 'O/A/B' ring pair placement is also shown as reference in that photo.
The remainder is, like in the previous tutorial, identical to the Insanihedron.
The Gagahedron is a really large, and thus also laborious one - but it's worth the effort. It is the next step on the progression ladder of Insanihedron, Nutsohedron, Absurdihedron, and now Gagahedron. It shares the icosahedral Goldberg polyhedron basis structure with these, and thus it's also made up of twenty triangular segments, plus a dozen corner fillets. As these large spheroids need already pre-bent surface segments to end in an as perfect as possible sphere, these triangles must be woven from differently sizes 'face' rings with growing complexity. While for the Insanihedron two differently sized face ring types (plus a third for the buds) suffice, here already four are needed (plus a fifth for the buds).
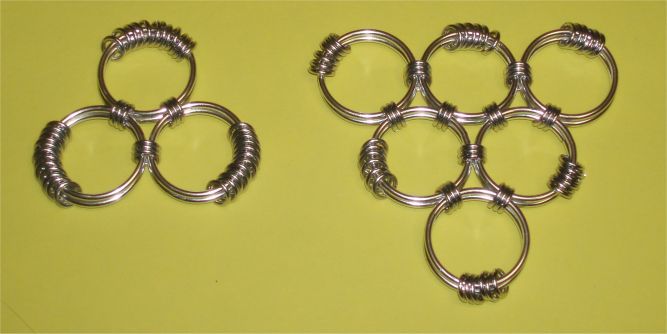
But now let's start to weave - as usual with the laborious part. If you want to have all connector preclosing work done before actually weaving, a total of 2700 'D' rings have to preclosed - 135 for every of the twenty triangles. The weaving succession is now as follows, and start with opening the 'X' marked ring bag:
I recommend to repeat this, until you have twenty of these triangle cores, before continuing. Once done, the bag with remaining 'X' rings can be laid aside, and the 'O' ring bag opened, as we continue now with these.
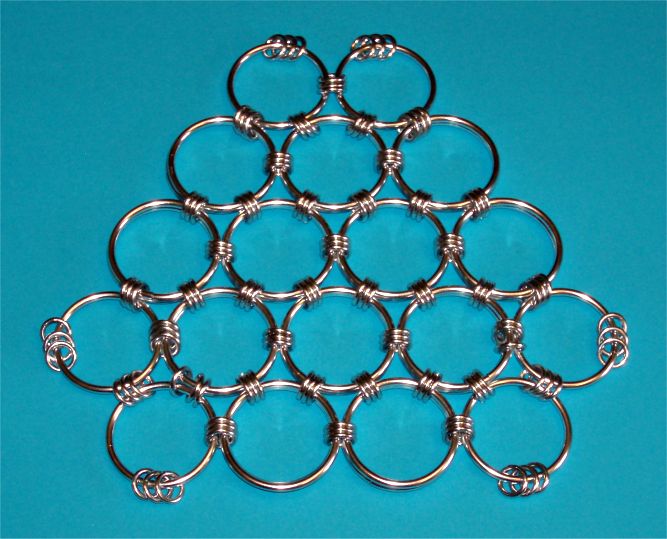
Similar to setting the third ring pair of the core triangles go through three connectors of the neighboring rings each, add twelve (12) preclosed connectors before doubling up, just this time with 'O' rings. I recommend to add one ring plus connectors all around, BEFORE doubling all three up, as else it could happen, that the right addon positions can be confused due to the very minimal diameter difference of X and O rings - the photo shows these rings in single and not yet doubled-up state.
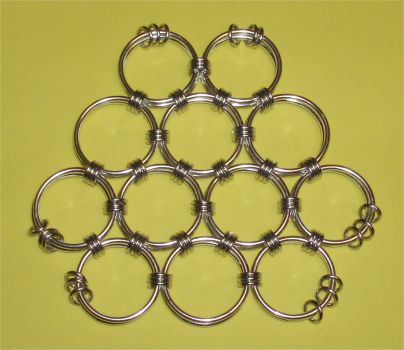
As the 'O' rings are by far not yet expended, we continue with them - again I recommend to weave them first as single rings all-around, and then to double up, to avoid any possible confusion. In this step we add at every of the three edges of the now six-pair triangle an 'O' ring, through three connectors each, add six new connectors, and then add its neighbor 'O', now through three 3-connector sets, and adding just three further connectors. This state is shown in the next photo. Of course doubling up the O's has to follow, before we continue with the next step.
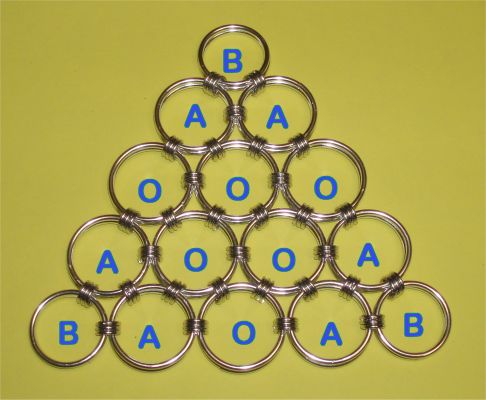
The remaining 'O' rings can now go to the same storage as the 'X' remainders, as we don't need these anymore for that spheroid. Instead break out now the 'A' ring bag. And as shown in the next photo, add these at the long edges of the core hexagons - always the first ring with six, then the second with 3 addon connector rings - at all three edges. And of course, my recommendation stands, to weave them first as single A rings all around, before doubling them up.
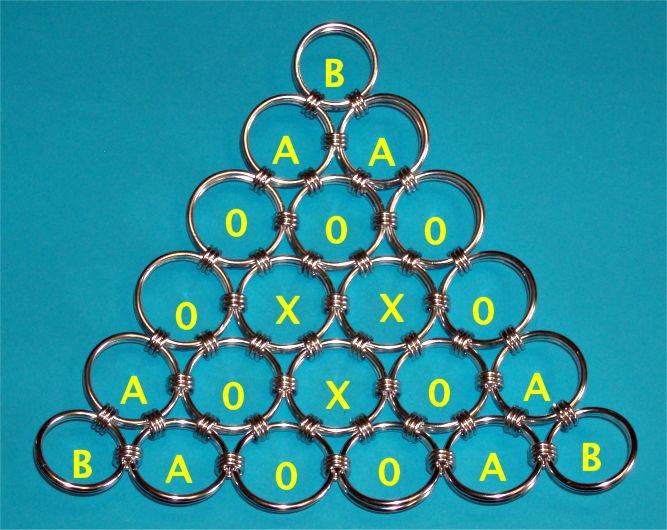
Last, but not least, the remaining 'A' rings can go to storage, and the triangle corners are finished with 'B' ring pairs - without adding of further connectors. This is shown in the last photo; in the end, the triangles will have no loose connectors at their outside. For documentation, I marked where which face rings have to go. Besides: You may have noticed that the resulting triangles dish already up. This is intentional, as it leads to the proper spheroid shape of the finished ball.
The remainder is, like in the previous tutorial, identical to the Insanihedron, Nutsohedron, and Absurdihedron - and I refer for the triangles' mounting to the linked tutorial.
The 92-face Yetsanihedron is an inbetween design of standard 72-face spheroid, and the 132-face Insanihedron - geometrically seen, it resembles an Icosidodecahedron, with its twelve pentagonal surfaces built from six sub-faces, represented by rings, while the twenty triangles become hexagons, in maille - or see it as a snub dodecahedron - maille can be so crazy, that depending on interpretation of a ring's function (face, edge, or corner) often dual or even multiple interpretations are possible.
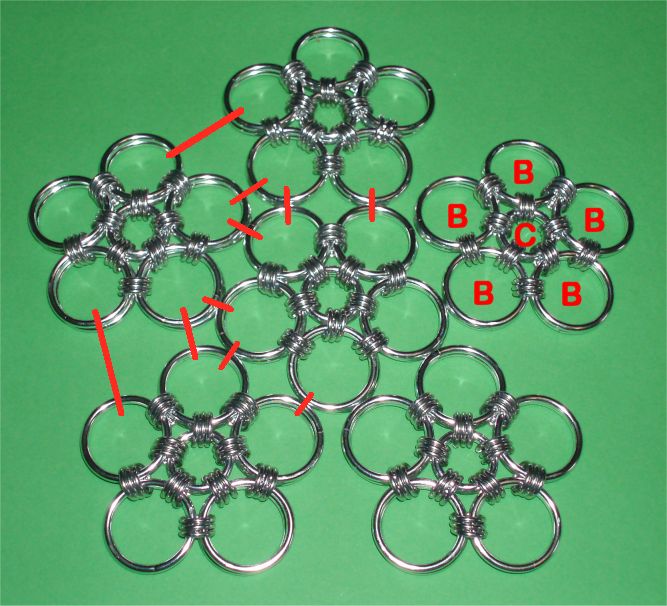
So its weaving will work with an Insanihedron's ring size selection, but leans structurally more to the standard polyhedron. In fact here also twelve 'flowers' are woven, identical to the standard spheroid, from Insanihedron 'C' rings as 'buds', and 'B' ones as petals, connected with 'D' rings.
Thereafter, in the 'Standard Spheroid' design, the flowers are connected edge to edge, before finally sewing up, shifting the flowers trapezoidal to each other, and stitch up. This edge to edge connection step is shown in the first photo, and can also be seen in the standard speroid's tutorial. Do NOT continue in this way, but go on reading first!
The Yetsanihedron is now woven differently. Here the flowers are connected NOT edge to edge, but corner to corner (connections sketched red), and then the hexagonal holes are filled in with 'A' ring pairs (yellow connections). And there is also NO edge shifting done, as in previous design. The Yetsanihedron's connection scheme is shown in the second photo. Note that I laid out only single 'A' rings, but of course these are woven also as pairs.
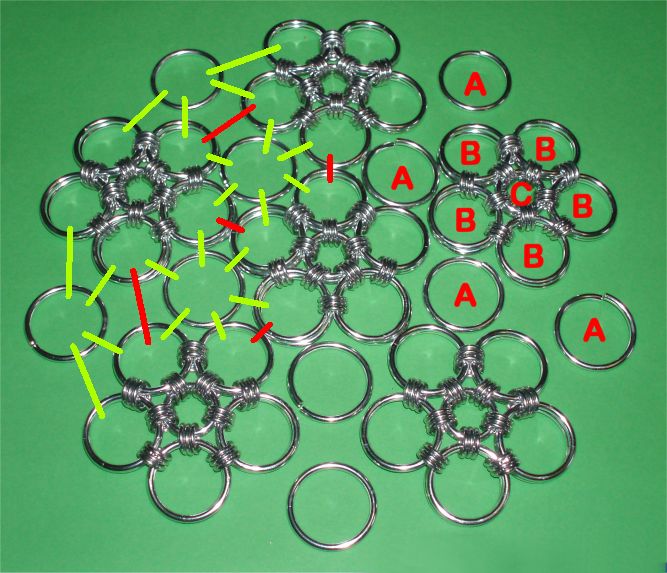
I recommend to set the 'new A bud' ring pairs as early as possible, but first with single connectors, and a hemispherical bowl will emerge. Repeat the previous steps to create a second one, to sew the two finally together. After the halves are joined, the A bud connections should then be doubled, or tripled, to reach the ball's final stiffness, and to fine-tune the ball's shape.
I hope that info suffices for now. If not, let me know.
Have fun with your new maille ball.
-ZiLi-
P.S.: As usual - If you need ring kits of proven size combinations, or simply have further questions or proposals to make this tutorial better, ask me via FaceBook chat (Heinrich Zinndorf-Linker), or per eMail to maille@zili.de.