This article may be a tutorial to make a particular type of Japanese spheroid polyhedron, but shall serve to show methods and techniques to be able to make principally all geometrically possible bodies one can imagine.
First of all have the needed tools around - besides 'normal' mailleing pliers it is good to have pointy, but FLAT-JAW pliers around, as these help, if the second of paired connector rings is set in the often very confined space in a Japanese weave; else it gets more difficult as necessary. Then you need a healthy portion of patience; alternatively stubbornness may serve as substitute.
Now to the supplies: You need rings - depending on chosen design at least two types. First, the rings that shall serve as 'faces' of the to be created body, and second, the connector rings that hold all together. While the face rings' sizing is not really critical, as long as these are large enough to hold the sufficient number of connector rings around the rim, the connector ring sizing is VERY critical, as it decides, how rigid (or plastic) the final object will be. And if pentagonal face surfaces shall be created, for the chosen body, two types of large rings are needed, that allow to surround a central, a bit smaller ring by five slightly larger ones, without a significant gap.
For selection of a to be made body, it might be fine to look up Wikipedia for Platonic Solids, and browse from there, to Archimedean Solids, Catalan Solids, and other related bodies like Goldberg polyhedra, to choose from. There are sooo many possibilities...
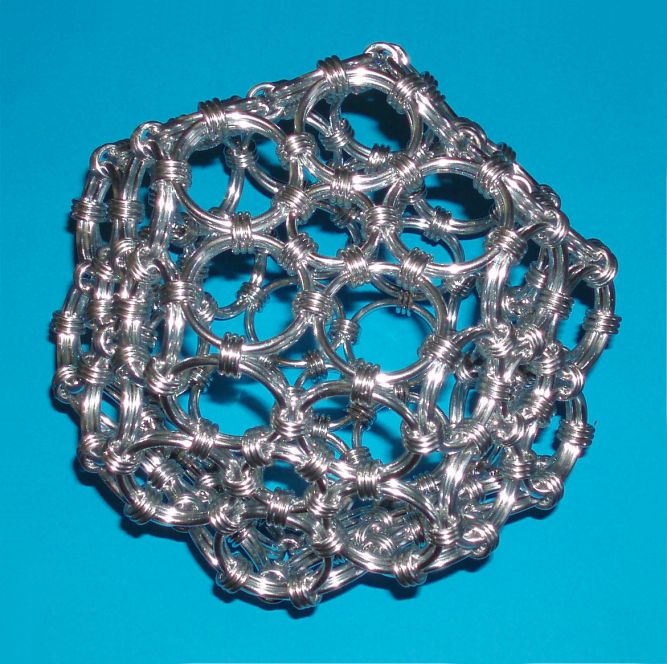
For showing some techniques I chose such a body - the so called dodecahedron as basis, that is a body ('-hedron'), that consists of twelve ('dodeca') faces, in this case pentagonal ones. Note that there are simpler, less complex variants of that body; in fact this enlargened version nears already a 'Buckyball', and ends even up as a nearly perfect sphere [see edit note at end of article]. The chosen rings were 1.6mm (~16swg) BA coiled on 19/64" (final AR ~5.0) for the pentagon core rings, that are large enough to hold ten connector rings of same wire diameter; a bit smaller, down to 17/64" (AR~4.6) might have been possible. Further I chose 1.6mm x 7/16" (AR~7.5) for the surrounding face rings; here also smaller ones, down to 3/8" should have been possible, but this depends on the pentagon core ring size, as these sizes depend on each other. Just arrange five 'petal' rings around one core ring and see whether there's not more much open space when the petals touch the bud.
And last but not least the connectors were the difficult part: For a Japanese 4in2 connection (2-2-2) to connect two ring pairs by a ring pair to be rigid, an AR of 2.6 is needed - if a slight bend of the connection is needed, and a bit 'wiggle room' shall be given, a slightly higher AR is needed. So I made rings from 1.6mm wire, and coiled them on an US drill rod #20 (~4.09mm) sized mandrel, to achieve an AR of ~2.64 - if smaller, e.g. 4.0mm (AR~2.60) rings were used, the flat pentagons would be weavable, but there would not have been room for bending at the transition from one face to the neighboring one. Here it can be of advantage, also depending on availablility of ring sizes, to chose two different connector ring sizes, or to execute some connections with three parallel rings (if higher AR) instead of two, or only one (if the rings are just a tad too small to give enough bend), to achieve the wished stiffness. For example I wove an identical sphere to the one shown here, using 1.6mm x 5/32" (AR~2.59) rings, and executed only the twelve five-leaf flowers with paired connectors, but all interconnections of these with single-ring connections - it worked out in the end, but the last twenty or so rings were a PITA to weave, and needed already some weaving tricks. And given the proper inner ring diameters are found, even other wire diameters are possible, like e.g use of three parallel 18 or 19swg rings instead of originally planned two 16swg ones. Often some experimenting is asked for, to find proper ring combinations - one cannot calculate all in advance, once bent connections enter the game.
And for other ring combinations it's good to look up this fine article on mailleartisans.org - note that we need usually the 'flat sheet' minimum ARs, to make the faces, but for connecting the flat faces, at the bent edges, higher ARs as minimum are needed, so here some experiments are needed. Parts of this selection process can be seen at my ring selection for the sample body, that needs only slightly increased minimum AR of a Japanese 4in2 connection, from 2.6 to 2.65, and not more. Other bodies, with higher edge bend angles, need a higher increase - and remember: In case it gets too loose (maybe due to ring size availability issues), often the simplest solution is then, to add a third connector ring parallel to an originally planned ring pair, to tighten things up.
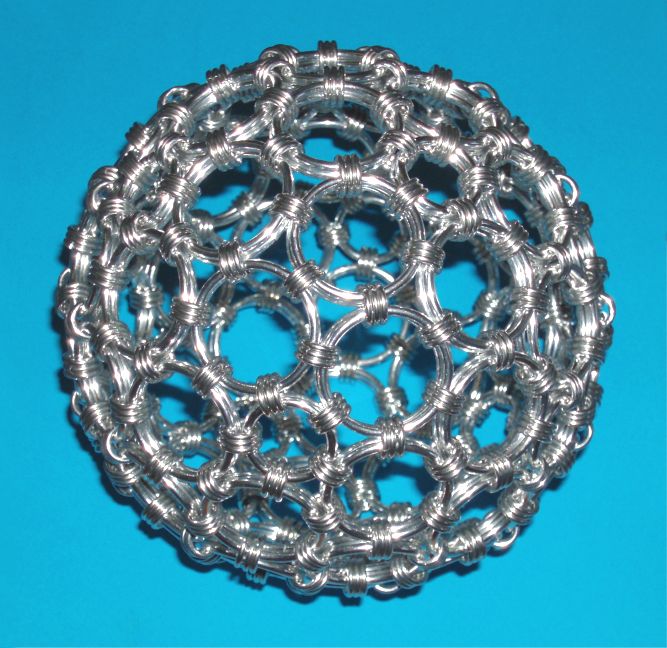
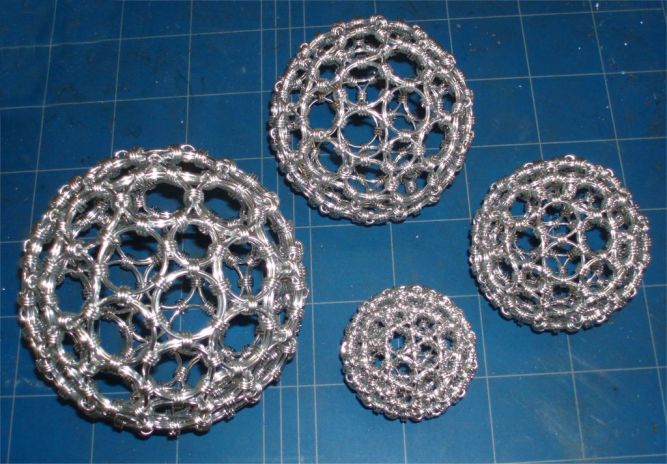
Note that this tutorial shows the buildup and documents ring sizes of the 72-face Goldberg polyhedron in ZiLi Maille ring kit size 'S', that is woven with paired connectors - like the smaller C, XS, XXS are. The also available sizes M, L, and XL are woven optimally with tripled connectors (and are delivered with sufficient amounts of rings to do so). Size 'M' is conceived as a 'transition' size, that works already with paired (yet a bit squishy), partially tripled (different patterns possible, to steer stiffness), and also completely tripled (so rigid, that some large face rings begin already to be pulled a bit open, so their closings have to be hidden under the connectors). Sizes L and XL should be woven directly triple-connected only. Here also slightly pulled-open face rings can be observed, sometimes - this is a sign that maximum possible stiffness is reached. I did this deliberately, to give the customer not only satisfaction, but also some learning experience.
Oh and a bit patience is also a nice-to-have in your supplies box. No, that's not a mistake or repetition - you'll need plenty of, so spending a bit from supplies patience serves to maintain the tools stock of, and avoid flying pliers or maille, later in the project. Be warned...
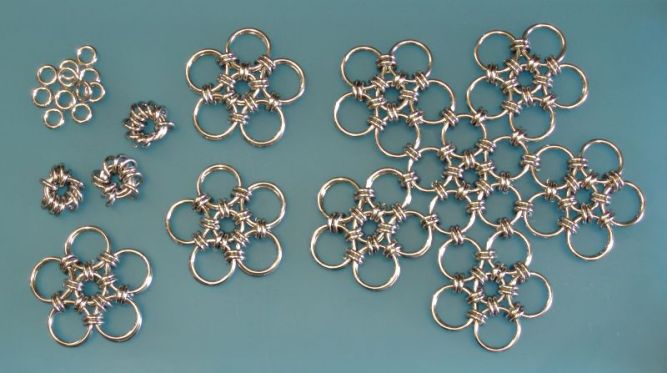
As told, this body consists of twelve pentagons, so it's logical to weave these first, and then join them up to build the body. This is my preferred technique, but it's also possible to select a starting point, and weave from that on, to build a flat bowl, that grows into a hemisphere, and is built up to the top, to be finally closed to the finsihed sphere. And it's even possible to weave a completely flat network of the needed surfaces, that is finally joined up at the seams, to end in the quasi-spherical object. Shown is here from left to right:
Again: While not clearly visible in the first two photos, not only the connectors, but ALSO the 'bud' and 'petal' rings have to be PAIRED, else one will never get a solid shape, in the end! Four Three of my customers ran already into this trap.
I found it best to weave in a succession, the leads from from small and tight, towards large rings, and areas with more room to work within. And I found it of advantage to make 'building blocks' that are easier manageable, and to join them up later.

Now two flowers are arranged in a manner similar to a typical dodecahedron's net - these nets can be looked up in e.g. the Wikipedia articles (dodecahedron's is linked above) describing the targeted bodies. I did NOT connect these, as I built this times two independent hemispheres first, to join them up later to a complete sphere. But there speaks not much against joining these now, only the handling might be a bit more difficult due to the larger not yet stable piece in hands.
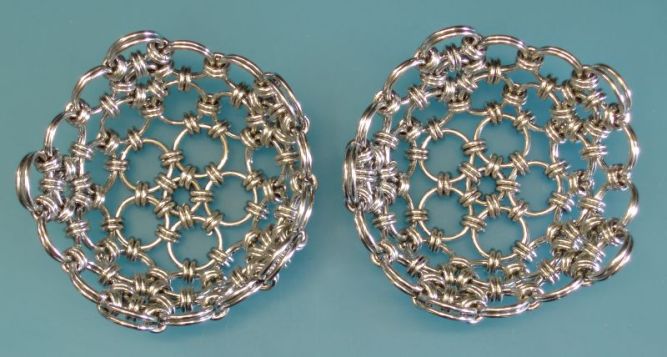
Now both flower's 'petals' are joined up; and two hemispherical shapes begin already to emerge. Note that as long as the weaves laid flat, they were not yet really rigid. Now, when sewing up the petals, the stiffness begins to emerge.

Here the two hemispheres are stitched up, with single rings first, to get the completed body shape relatively quick. Note that the four ring pairs of the petals, that were shown in a rectangular 2x2 arrangement, are now shifted to a trapezoid rhomboid shape, and also stitched up (Sorry, I forgot to take a photo of that). This is often inevitable, and you will notice that fact, should you decide to rebuild this sample sphere shown here. Oh and I stuck a 'marker rod' through the hemisphere pole rings, to see better, where to work next - this (or another marker) is not needed, but can help to avoid mistakes. If you chose low-AR limit rings (AR~2.6 instead of my chosen AR~2.65 ones) for making the twelve pentagons, it's also possible to avoid this shifting - in that case you get a perfect dodecahedron, given a bit higher-AR rings are used for connecting the edges. Experiments showed, that this is also possible with my given ring size choice - just press the pentagon core rings always 'inwards' to maintain the nonshifted rectangular edge connections (Sorry, no photo of this is provided, as well).

Now every yet single join ring got its sibling, to finish the sphere. As this is comparably difficult due to the limited work space, here the pointy flat-jaw pliers come handy, while I wove the whole time before with my slightly fatter standard pliers, that are optimised for leverage and good grip.
And tadaaa - we have a Japanese spheroid dodecahedron Goldberg polyhedron in our hands.
Edit Oct.30, 2014: While originally constructed as dodecahedron, the trapezoid rhomboid shift and connecting of the 2-2 petal connections to two triangles produces a 72-face Goldberg G (2,1) sphere, consisting now of sixty hexagons and twelve pentagons - even more complex as the typical Buckyball's 32-face 'football body' that consists also of pentagons and hexagons, but is G (1,1) in Goldberg nomenclature. Not even I was aware of that until I read today an article about these, and recognized the true structure of my sample polyhedron...
If you want to rebuild this one, have fun. If you have questions, e.g. about other Japanese solids (I wove already a couple of different ones, while I clearly prefer the spheroid bodies), tell them via FaceBook Chat, or via eMail to maille@zili.de
And if you cannot get your needed connector rings anywhere else: I can supply you with these as well - and even complete ring kits to rebuild (hint, hint)...
-ZiLi-
Add-on Apr.12, 2015
In the meanwhile I wove these spheroids in several larger sizes, up to more than double size of the original one. Ring kits for these are available from me. Note that for the larger bodies the originally paired-ring connectors have to be tripled to get a really rigid ball - they will hold their shape well if executed in double-connector, though.
Note that I took this time photos, how the very same body can look before the rhomboid shift (=dodecahedron), and shifting plus lock-weaving to a Goldberg ball.